CSS 레이아웃 기초 - 완성형 예제
"일모리의 CSS 쉽게 배우기" 사이트를 보다가 간단하게 한번 짜보았습니다.
전체너비 700픽셀 가운데 정렬이며 충분히 실전에 사용가능한 심플한 예제입니다.
<!-- content exp --> 에서 <!-- /content exp --> 까지는 content 영역에 여러번 복제해서 사용해도 되도록 했습니다.
부족한 부분은 코멘트를 통해 보충해주시면 고맙겠습니다.
<!DOCTYPE HTML PUBLIC "-//W3C//DTD HTML 4.0 Transitional//EN">
<html>
<head>
<title> CSS 레이아웃 예제 </title>
<meta name="Generator" content="EditPlus">
<meta name="Author" content="">
<meta name="Keywords" content="">
<meta name="Description" content="">
<style type="text/css">
/*기본코드*/
html {
background: none;
padding: 0;
margin: 0;
text-align: center;
font-family: tahoma, verdana, gulim, 굴림,sans-serif;
font-size: 12px;
}
body {
margin: 0;
text-align: center;/*가운데 정렬*/
}
a {
text-decoration: none;
color: black;
}
/*wrap */
#wrap {
background: #eee url(wrap.gif) no-repeat top left;
width: 700px;
padding: 0;
margin: 0 auto;
text-align: left;
}
/*wrap ie - ie에서는 width, height값에 padding, border 값등을 더한 값을 주어야 한다 */
* html #wrap {
width: 710px;
}
/* header 부분 */
/* id= header 로 정해진곳을 부릅니다 */
#header {
background: #aaa url(header.gif);
border: 1px solid #ddd;
width: 600px;
height: 70px;
padding: 0;
margin: 0;
}
/*sidebar 부분 */
.sidebar {
width: 90px;
padding: 0;
margin: 0;
background: #eee url(sidebar.gif) no-repeat top left;
float:left; /*왼쪽으로 붙입니다*/
}
.sidebar ul {
padding: 0;
margin: 0px;
}
.sidebar ul li {
padding: 0;
margin: 0;
list-style-image: none;
list-style-type: none;
}
/* menu 의 링크 꾸미기 없게*/
.sidebar ul li a {
text-decoration: none;
}
/* content 부분 */
#content {
float: left;
width: 500px;
padding: 0;
margin: 0;
text-align: left;
background: #bbb;
}
#content .mid {
float: left;
width: 245px;
padding: 0;
margin: 0;
text-align: left;
background: #ddd;
}
#content .right {
float: left;
width: 245px;
padding: 0;
margin: 0;
text-align: left;
background: #ccc;
}
.writing {
line-height: 150%;
letter-space: .2em;
margin:0;
width: 245px;
}
.hspace {
float: left;
width: 10px;
height: auto;
margin: 0;
padding: 0;
background: #fff;/*transparent*/
}
.vspace {
width: auto;
height: 10px;
margin: 0;
padding: 0;
background: #fff;/*transparent*/
clear:both;
}
/* id= footer 로 정해진곳을 부릅니다 */
#footer {
background: #ccc url(footer.gif);
border: 1px solid #ddd;
width: 600px;
height: 70px;
padding: 0;
margin: 0;
}
</style>
</head>
<body>
<div id="wrap">
<pre>
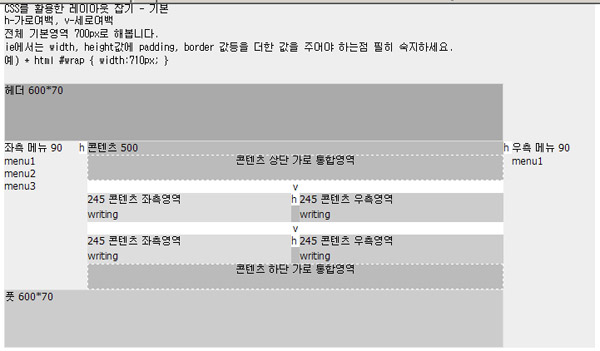
CSS를 활용한 레이아웃 잡기 - 기본
h-가로여백, v-세로여백
전체 기본영역 700px로 해봅니다.
ie에서는 width, height값에 padding, border 값등을 더한 값을 주어야 하는점 필히 숙지하세요.
예) * html #wrap { width:710px; }
</pre>
<div id="header">헤더 600*70</div>
<div class="sidebar">좌측 메뉴 90
<ul>
<li>menu1</li>
<li>menu2</li>
<li>menu3</li>
</ul>
</div>
<div class="hspace">h</div>
<div id="content">콘텐츠 500 - 콘텐츠 최상위 영역으로 실제 보이지 않음
<div style="text-align:center;border:1px dashed #fff;">콘텐츠 상단 가로 통합영역<br><br></div>
<div style="clear:both;"></div>
<!-- content exp -->
<div class="vspace" style="text-align:center;">v</div>
<div class="mid">245 콘텐츠 좌측영역
<div class="writing">
<p>writing</p>
</div>
</div>
<div class="hspace">h</div>
<div class="right">245 콘텐츠 우측영역
<div class="writing">
<p>writing</p>
</div>
</div>
<div style="clear:both;"></div>
<!-- /content exp -->
<div style="text-align:center;border:1px dashed #fff;">콘텐츠 하단 가로 통합영역<br><br></div>
</div>
<div class="hspace">h</div>
<div class="sidebar">우측 메뉴 90
<ul>
<li>menu1</li>
</ul>
</div>
<div style="clear:both;"></div>
<div id="footer">풋 600*70</div>
</div>
</body>
</html>
전체너비 700픽셀 가운데 정렬이며 충분히 실전에 사용가능한 심플한 예제입니다.
<!-- content exp --> 에서 <!-- /content exp --> 까지는 content 영역에 여러번 복제해서 사용해도 되도록 했습니다.
부족한 부분은 코멘트를 통해 보충해주시면 고맙겠습니다.
<!DOCTYPE HTML PUBLIC "-//W3C//DTD HTML 4.0 Transitional//EN">
<html>
<head>
<title> CSS 레이아웃 예제 </title>
<meta name="Generator" content="EditPlus">
<meta name="Author" content="">
<meta name="Keywords" content="">
<meta name="Description" content="">
<style type="text/css">
/*기본코드*/
html {
background: none;
padding: 0;
margin: 0;
text-align: center;
font-family: tahoma, verdana, gulim, 굴림,sans-serif;
font-size: 12px;
}
body {
margin: 0;
text-align: center;/*가운데 정렬*/
}
a {
text-decoration: none;
color: black;
}
/*wrap */
#wrap {
background: #eee url(wrap.gif) no-repeat top left;
width: 700px;
padding: 0;
margin: 0 auto;
text-align: left;
}
/*wrap ie - ie에서는 width, height값에 padding, border 값등을 더한 값을 주어야 한다 */
* html #wrap {
width: 710px;
}
/* header 부분 */
/* id= header 로 정해진곳을 부릅니다 */
#header {
background: #aaa url(header.gif);
border: 1px solid #ddd;
width: 600px;
height: 70px;
padding: 0;
margin: 0;
}
/*sidebar 부분 */
.sidebar {
width: 90px;
padding: 0;
margin: 0;
background: #eee url(sidebar.gif) no-repeat top left;
float:left; /*왼쪽으로 붙입니다*/
}
.sidebar ul {
padding: 0;
margin: 0px;
}
.sidebar ul li {
padding: 0;
margin: 0;
list-style-image: none;
list-style-type: none;
}
/* menu 의 링크 꾸미기 없게*/
.sidebar ul li a {
text-decoration: none;
}
/* content 부분 */
#content {
float: left;
width: 500px;
padding: 0;
margin: 0;
text-align: left;
background: #bbb;
}
#content .mid {
float: left;
width: 245px;
padding: 0;
margin: 0;
text-align: left;
background: #ddd;
}
#content .right {
float: left;
width: 245px;
padding: 0;
margin: 0;
text-align: left;
background: #ccc;
}
.writing {
line-height: 150%;
letter-space: .2em;
margin:0;
width: 245px;
}
.hspace {
float: left;
width: 10px;
height: auto;
margin: 0;
padding: 0;
background: #fff;/*transparent*/
}
.vspace {
width: auto;
height: 10px;
margin: 0;
padding: 0;
background: #fff;/*transparent*/
clear:both;
}
/* id= footer 로 정해진곳을 부릅니다 */
#footer {
background: #ccc url(footer.gif);
border: 1px solid #ddd;
width: 600px;
height: 70px;
padding: 0;
margin: 0;
}
</style>
</head>
<body>
<div id="wrap">
<pre>
CSS를 활용한 레이아웃 잡기 - 기본
h-가로여백, v-세로여백
전체 기본영역 700px로 해봅니다.
ie에서는 width, height값에 padding, border 값등을 더한 값을 주어야 하는점 필히 숙지하세요.
예) * html #wrap { width:710px; }
</pre>
<div id="header">헤더 600*70</div>
<div class="sidebar">좌측 메뉴 90
<ul>
<li>menu1</li>
<li>menu2</li>
<li>menu3</li>
</ul>
</div>
<div class="hspace">h</div>
<div id="content">콘텐츠 500 - 콘텐츠 최상위 영역으로 실제 보이지 않음
<div style="text-align:center;border:1px dashed #fff;">콘텐츠 상단 가로 통합영역<br><br></div>
<div style="clear:both;"></div>
<!-- content exp -->
<div class="vspace" style="text-align:center;">v</div>
<div class="mid">245 콘텐츠 좌측영역
<div class="writing">
<p>writing</p>
</div>
</div>
<div class="hspace">h</div>
<div class="right">245 콘텐츠 우측영역
<div class="writing">
<p>writing</p>
</div>
</div>
<div style="clear:both;"></div>
<!-- /content exp -->
<!-- content exp -->
<div class="vspace" style="text-align:center;">v</div>
<div class="mid">245 콘텐츠 좌측영역
<div class="writing">
<p>writing</p>
</div>
</div>
<div class="hspace">h</div>
<div class="right">245 콘텐츠 우측영역
<div class="writing">
<p>writing</p>
</div>
</div>
<div style="clear:both;"></div>
<!-- /content exp -->
<div style="text-align:center;border:1px dashed #fff;">콘텐츠 하단 가로 통합영역<br><br></div>
</div>
<div class="hspace">h</div>
<div class="sidebar">우측 메뉴 90
<ul>
<li>menu1</li>
</ul>
</div>
<div style="clear:both;"></div>
<div id="footer">풋 600*70</div>
</div>
</body>
</html>
[이 게시물은 관리자님에 의해 2011-10-31 17:16:08 PHP & HTML에서 이동 됨]
첨부파일
|
댓글을 작성하시려면 로그인이 필요합니다.
댓글 11개
간략하고 깔끔하게 정리를 잘 해 주셨군요~*^^*
그저 많이 쓰이는 형태를 최대한 단순하게 레이아웃만 잡아봤습니다.
예전에 익히면서 적용한 곳들을 지금 보면 군더더기가 널려있는것을 봅니다만, 엄두를 못내고 있습니다.
이 역시 처음 시작이 중요한듯 합니다.
점심 맛있게 먹었습니다.
처음 시작이 미미해 보일지라도,
그 체계가 단순하고 정형화가 잘 되어 있다면,
언제라도 그것을 통해 응용 및 확장이 용이하리라 생각됩니다.
극히 단순한 레이아웃이 아닌 경우라면,
그럴듯해 보이는 css layout이라 할지라도,
그 소스코드가 방대한 경우가 대다수인데,
이러한 기본적인 틀만 가지고도 어느 정도만 이해가 가능하다면,
충분히 화려한 레이아웃 그 이상으로도 변화 & 발전시킬 수 있다고 봅니다.
수고하셨어요~
그러나 <!DOCTYPE HTML PUBLIC "-//W3C//DTD HTML 4.0 Transitional//EN"> 이 있을때와
없을때는 현재 위에서 짜여진 레이아웃에도 미묘한 차이가 생길듯 합니다.
현재 그누보드에서는 선언되지 않은 일반 html 문법을 사용하고 있죠
그러므로 왜 <!DOCTYPE HTML PUBLIC "-//W3C//DTD HTML 4.0 Transitional//EN"> 를 선언했는지를
먼저 알아본 후 스타일을 이용해 레이아웃을 잡아 주시는 것이 중요해 보입니다.
그리고 위와 같이 선언했을 경우는 선언에 맞게 메타태그가 따로 놀지 않도록
<meta name="Generator" content="EditPlus" />
<meta name="Author" content="" />
<meta name="Keywords" content="" />
<meta name="Description" content="" />
태그 닫는 "/" 를 붙여 주어야 겠죠.
또 레이어 안에 내용물에 따라서도 레이어가 깨질수도 있겠군요
overflow:hidden; 을 적절하게 사용해 보세요.
해당 서브 목록의 글들만 모두 읽어 보고
(전 읽는데 30분 정도 걸렸습니다. 그리고 실행결과를 보기위해선 익스로 접속해야 하더군요)
왜...??? doctype 을 지정하는지 어떻게 사용하는지
페이지 레이아웃을 만들때 알아두어야 하는 것들과
익스에서의 div 태그 사용시 margin, padding, border 인하여 생기는 버그에 관해서 한번 알아보고
아래 css로 짜여진 레이아웃들을 다운받아 많이 다루어 보면 좋을듯 합니다.
http://www.freelayouts.com/
http://templates.arcsin.se/
http://www.templateworld.com/
http://www.oswt.co.uk/
http://www.cssfill.com/
http://www.oswd.org/
http://www.free-css-templates.com/
http://www.templatesbox.com/
http://www.ex-designz.net/template/
불여우에서도 잘 동작하는군요..
단, 불여우에서는 <pre> 부분도 마진을 잡아줄 경우 ... ^^
많은 참고가 될듯 합니다....감사합니다...^^