






리엑트 플레이어2 게시판


기본 방법과 같이 사용 하면되며 다중파일도 작성 가능하도록 사용했습니다.
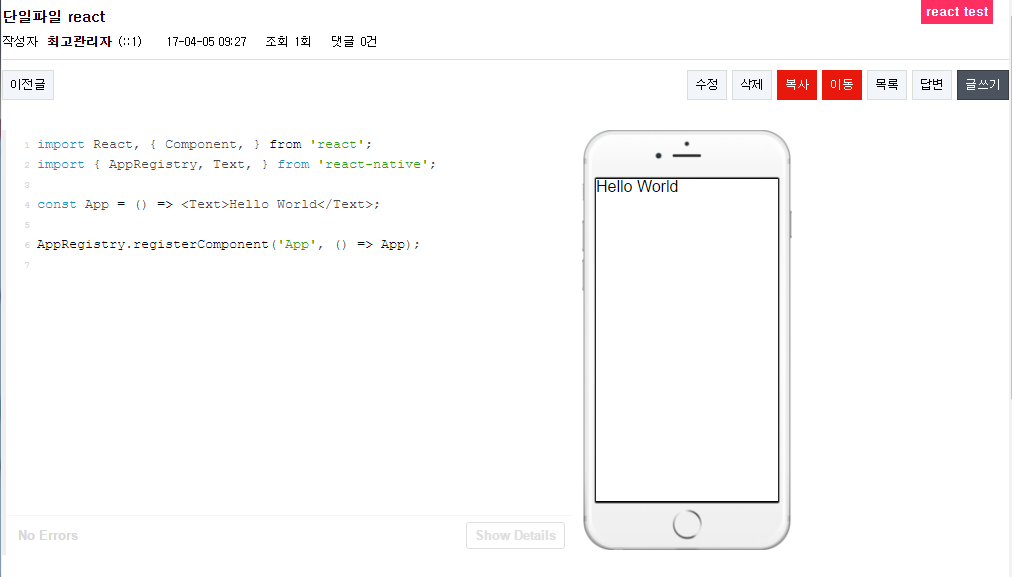
# 단일 소스 예시
[code]
[react:ios]
import React, { Component, } from 'react';
import { AppRegistry, Text, } from 'react-native';
const App = () => <Text>Hello World</Text>;
AppRegistry.registerComponent('App', () => App);
[/react]
[/code]
# 다중소스 예시
[code]
[react:ios]
[vendor:redux,Redux,https://cdnjs.cloudflare.com/ajax/libs/redux/3.6.0/redux.min.js]
[vendor:react-redux,ReactRedux,https://cdnjs.cloudflare.com/ajax/libs/react-redux/4.4.5/react-redux.min.js]
[vendor:redux-persist,redux-persist,https://cdnjs.cloudflare.com/ajax/libs/redux-persist/4.0.0-alpha7/redux-persist.js]
[file:index.js]
import { AppRegistry, View } from 'react-native'
import { createStore } from 'redux'
import { Provider } from 'react-redux'
import { persistStore, autoRehydrate } from 'redux-persist'
// Import the reducer and create a store
import { reducer } from './todoListRedux'
// Add the autoRehydrate middleware to your redux store
const store = createStore(reducer, undefined, autoRehydrate())
// Enable persistence
persistStore(store)
// Import the App container component
import App from './App'
// Pass the store into the Provider
const AppWithStore = () => (
<Provider store={store}>
<App />
</Provider>
)
AppRegistry.registerComponent('App', () => AppWithStore)
[/file]
[file:todoListRedux.js]
// The types of actions that you can dispatch to modify the state of the store
export const types = {
ADD: 'ADD',
REMOVE: 'REMOVE',
}
// Helper functions to dispatch actions, optionally with payloads
export const actionCreators = {
add: (item) => {
return {type: types.ADD, payload: item}
},
remove: (index) => {
return {type: types.REMOVE, payload: index}
}
}
// Initial state of the store
const initialState = {
todos: ['Click to remove', 'Learn React Native', 'Write Code', 'Ship App'],
}
// Function to handle actions and update the state of the store.
// Notes:
// - The reducer must return a new state object. It must never modify
// the state object. State objects should be treated as immutable.
// - We set \`state\` to our \`initialState\` by default. Redux will
// call reducer() with no state on startup, and we are expected to
// return the initial state of the app in this case.
export const reducer = (state = initialState, action) => {
const {todos} = state
const {type, payload} = action
switch (type) {
case types.ADD: {
return {
...state,
todos: [payload, ...todos],
}
}
case types.REMOVE: {
return {
...state,
todos: todos.filter((todo, i) => i !== payload),
}
}
}
return state
}
[/file]
[file:App.js]
import React, { Component } from 'react'
import { AppRegistry, View } from 'react-native'
import { connect } from 'react-redux'
import { actionCreators } from './todoListRedux'
import List from './List'
import Input from './Input'
import Title from './Title'
const mapStateToProps = (state) => ({
todos: state.todos,
})
class App extends Component {
onAddTodo = (text) => {
const {dispatch} = this.props
dispatch(actionCreators.add(text))
}
onRemoveTodo = (index) => {
const {dispatch} = this.props
dispatch(actionCreators.remove(index))
}
render() {
const {todos} = this.props
return (
<View>
<Title>
To-Do List
</Title>
<Input
placeholder={'Type a todo, then hit enter!'}
onSubmitEditing={this.onAddTodo}
/>
<List
list={todos}
onPressItem={this.onRemoveTodo}
/>
</View>
)
}
}
export default connect(mapStateToProps)(App)
[/file]
[file:List.js]
import React, { Component } from 'react'
import { AppRegistry, View, TouchableOpacity, Text, StyleSheet } from 'react-native'
export default class List extends Component {
renderItem = (text, i) => {
const {onPressItem} = this.props
return (
<TouchableOpacity
style={styles.item}
onPress={() => onPressItem(i)}
>
<Text>{text}</Text>
</TouchableOpacity>
)
}
render() {
const {list} = this.props
return (
<View>
{list.map(this.renderItem)}
</View>
)
}
}
const styles = StyleSheet.create({
item: {
backgroundColor: 'whitesmoke',
marginBottom: 5,
padding: 15,
},
})
[/file]
[file:Input.js]
import React, { Component } from 'react'
import { AppRegistry, TextInput, StyleSheet } from 'react-native'
export default class Input extends Component {
state = {
text: '',
}
onChangeText = (text) => this.setState({text})
onSubmitEditing = () => {
const {onSubmitEditing} = this.props
const {text} = this.state
if (!text) return // Don't submit if empty
onSubmitEditing(text)
this.setState({text: ''})
}
render() {
const {onSubmitEditing, placeholder} = this.props
const {text} = this.state
return (
<TextInput
style={styles.input}
value={text}
placeholder={placeholder}
onChangeText={this.onChangeText}
onSubmitEditing={this.onSubmitEditing}
/>
)
}
}
const styles = StyleSheet.create({
input: {
padding: 15,
height: 50,
},
})
[/file]
[file:Title.js]
import React, { Component } from 'react'
import { View, Text, StyleSheet } from 'react-native'
export default class Title extends Component {
render() {
const {children} = this.props
return (
<View style={styles.header}>
<Text style={styles.title}>{children}</Text>
</View>
)
}
}
const styles = StyleSheet.create({
header: {
backgroundColor: 'skyblue',
padding: 15,
},
title: {
textAlign: 'center',
color: 'white',
},
})
[/file]
[/react]
[/code]
첨부파일
|
댓글을 작성하시려면 로그인이 필요합니다.
그누보드5 스킨
2,752건좋은 댓글과 좋아요는 제작자에게 큰힘이 됩니다.

게시판
겔리리 게시판을 가로세로로 변형해서 볼수 있습니다.

게시판
메인쪽에 빠른상담신청 게시판입니다. 스킨파일 올리시고 customer1.php는 루트폴더에 올리시고32번쨰줄에 게시판이름변경하시면됩니다.


회원가입
혹시 필요하신분 코드수정 시간절약 하시라고 올립니다. 회원가입에 계좌번호필드추가 관리자모드 신규가입회원에 계좌번호필드추가 관리자모드>회원정보수정에 계좌번호필드추가 ▼일단 ...

게시판
기본적으로 적용했으니 여러방법으로 응용이 가능할껏같습니다.. 기본이미지를 3장올리도록 되어 있으나..이미지가 있으면 출력하는 방법도 응용하시면 되겠지요^^ ...

최신글
<?phpecho latest_gallery('theme/gallery', 'gallery', 6, 25, 1, '', 150, 150, 3);?>겔러리스킨을 기반으로한 기본이 되...


최신글
<?php // 이 함수가 바로 최신글을 추출하는 역할을 합니다. // 사용방법 : latest(스킨, 게시판아이디, 출력라인, 글자수); // 테마의 스킨...

게시판
미니달력 출력 방법은 <?php // 이 함수가 바로 최신글을 추출하는 역할을 합니다. // 사용방법 : latest(스킨, 게시판아이디, 출력라인, 글자수); ...

게시판
기본 방법과 같이 사용 하면되며 다중파일도 작성 가능하도록 사용했습니다. # 단일 소스 예시[code][react:ios]import React, { Component, } fro...

게시판
게시판에서 첨부파일을 이미지 등록할때 내용에서 이미지가 슬라이드 되는 게시판입니다. 게시판 관리자에서 파일 업로드 개수를 늘리시면 늘리는대로 슬라이드가 적용됩니다~ 압축파일 열어보...
댓글 6개
[vendor:vendorComponents1]
[vendor:vendorComponents2]
[file:파일명]
소스내용1
[/file]
[file:파일명2]
소스내용2
[/file]
[/react]
view.skin.php의
[code]
<?php echo get_view_thumbnail(react_player($view['content'])); ?>
[/code]
를 수정 하시면됩니다.
[code]
<?php echo get_view_thumbnail(react_player($view['content'], (int)가로, (int)세로, (string)추가파라미터)); ?>
[/code]
화요일까지는 시간이 없으신 것 같아서 빨라도? 수요일 쯤 올라 올 줄 알았습니다!
이렇게 빨리 등록하시면 구경만하는 놈도 힘듭니다. 헤헤.
감사합니다.